GRESIK BELAJAR BISNIS ONLINE

Dunia online memberikan peluang besar bagi siapa saja yang mau memanfaatkannya dalam upaya membangun usaha melalui dunia online. Membangun bisnis dunia online sebenarnya susah-susah gampang tergantung orang yang memanfaatkannya. Jika belum dilakukan memang kelihatan repot, ribet, rumit dan "r-r-r" yang lain, namun ketika mau dan memutuskan untuk menekuninya ternyata gampang dan mengasyikkan...gak percayakan? Gimana mau percaya mencobanya saja belum...hehehe......

INTERNET TV

Samsung’s exclusive Internet@TV technology opens up more worlds than you can possibly imagine. And puts it all on large and brilliant screen....

CARA RESET EPSON T13

Bagaimana cara mengatasi blinking pada printer epson t13, ikuti langkah-langkahnya disini ...

KONTES SEO BLOG INDONESIA

Anda blogger Indonesia dan mempunyai kemampuan di bidang SEO. Ingin mengasah pengalaman dan kemampuan SEO anda. AYO IKUT SEGERA ...

SUARA DUNIA ONLINE

Semoga peluang besar dunia online mampu kita manfaatkan dengan baik dan benar, apapun itu selama memberi nilai yang baik dan tidak melanggar nilai-nilai kebenaran tidak ada salahnya kita mencobanya dengan berbekal saling berbagi dan tetap belajar untuk lebih baik...

Tuesday, March 29, 2011

Minolta 1080 error code list


Minolta 1080 error code list


C000 Main drive problem
C001 Main drive speed. Too fast or too slow
C004C Fan motor problem
C004E Power supply fan problem
C0070 Toner motor drive problem
C0071 Toner motor speed. Too fast or too slow
C010 Drum motor drive problem
C011 Drum motor speed. Too fast or too slow
C0400 Exposure lamp does not turn on or AE sensor problem
C0500 Low fuser temperature during warm-up
C0510 Low fuser temperature after warm-up
C0520 High fuser temperature
C0600 Scan motor drive problem
C0610 Lens motor drive problem
C0620 Mirror motor drive problem
C0990, C0991 Main tray up problem
C0992, C0993 Main tray down problem
C0994 Elevator motor problem
C0996 Main tray shift problem
C0998 Tray shift problem
C0999 Tray shift return problem
C099A, C099b Shift home problem
C099c Shift drive motor
C0b10 Auto exposure sensor problem
C0b11 Paper clamp motor
C0b30 Paper aligning motor
C0b31 Paper aligning motor
C0b50 Stapler motor
C0b51 Stapler problem
C0b52 Stapler sensor
C0b60 Sorter bin motor
C0b61-C0b64 Sorter bin movement
C0d00 Duplex rail sensor sensor problems
C0d20 Duplex home sensor
C0d50 Duplex drive motor problem
C0d51 Duplex drive motor speed
C0F10 Auto exposure sensor problem
C0F30 Paper aligning motor
C4100 Exposure lamp stays on
C0F79 Paper empty sensor problem

Saturday, March 26, 2011

Blogger Winter Christmas Snowflakes Effect

This year a lot of websites, wordpress blogs are adopting the new style of integrating snowflakes in their site design. So, why we Blogger get left out? ;-) Today, I'm going to show you, how to shower snowflakes on your blogger blog or website.

Let's get started. :-)  
Note: Before making any changes to your template, kindly take a full backup of your blogger template.

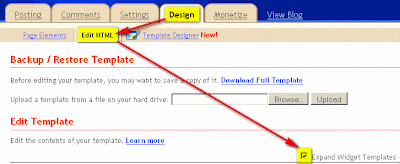
Step 1. Head over to your Dashboard and surf down to Design, next click on Edit HTML. Once your there, click on the Expand Widget Templates check box. Refer to the pic below.

blogger expand widget templates

Step 2. Find this code </body> and put below JavaScript code right before the </body> tag.

Blogger Winter Christmas Snowflakes Effect

Step 3. Save template and done!

This trick will look very pretty if your background color is black.

Download Snow Transformation Pack 1.5

Snow Transformation Pack 1.5 released by - STP will transform your Windows 7/Vista user interface to look like Mac OS X Snow Leopard.
Snow-Transformation-Pack-1.5

Like the look and feel of MAC OSX, but don’t want to switch from Windows? You can try the Snow Transformation Pack (STP) for Windows Vista and Windows 7. STP is more than just a theme; it completely changes the look and feel of Windows, including the welcome screen, icons, wallpaper, sounds, dock and overall visual style. While the changes are complete, it is also reversible. You can also revert to the classic Windows appearance and style by simply uninstalling the pack from ‘Add/Remove Programs’.

You can get for free from winxsoft

Word Lens for iOS realtime language translator

Here's this iApplication that's been the talk of the iTown for quite sometime now. Its called Word Lens for iOS.
Every so often an app comes along that makes you marvel at the ingenuity of the creators. Word Lens for iOS works on devices that have a camera (iPod Touch 4G and iPhone).

Word Lens iOS realtime language translator

Amazingly, it can translate text that the camera sees in real time (it does not need a network connection). It can be used a realtime language translator. Cool isn't? The app itself is free while each language pack costs $5. Currently only English to Spanish and Spanish to English packs are available, but more should be available soon.

Click here to download Word Lens iOS realtime language translator.

Nokia E7 business smartphone review

Nokia’s new business smartphone, the E7, is all set to rock the highly competitive Indian Mobile market. Nokia E7 is now in markets. Nokia E7 has been projected as the front-runner to both the E-series as well as the communicator series of business integrated smartphones. The E7 features the latest Symbian platform consisting of version 3 OS(much like the Nokia N8).

Nokia E7 smartphone review


The new Nokia E7 has a AMOLED capacitive 4-inch touchscreen which slides and then tilts up to reveal a 4-line backlit QWERTY keyboard with adequate spaced-out buttons(keys). It comes with a 8MP camera with 720p HD video recording, USB on-the-go(connect a USB flash drive to the phone directly), native HDMI output. Nokia E7 is aimed at the combination of the best of productivity, business, and entertainment features. Under its hood its got a 16 GB built in memory, which is not expandable.

Thursday, March 24, 2011

How to replace the belt on HP Designjet 5000 series


Remove the left hand cover:


Switch off the Printer and remove the power cable.
1. Remove ALL the Ink Cartridges from the Printer.
2. Open the Top Cover.
3. Open the door at the back of the Left Hand Cover.
4. Disconnect the Electrical Cable from the rear of the Ink Cartridge Tube Connector.

5. Disconnect the Air Tube.

6. Twist the 3 latches at the rear of the Ink Cartridge Tube Connector and release the complete Assembly.

7. Remove the Ink Cartridge Tube Connector and place safely on the window.

8. Remove 1 T-15 screw (Type F) from the Left Hand Cover (rear).

9. Close the Left Back door and remove 1 T- 25 screw (Type U) from bottom side (rear) of Left Hand Cover.

10. Remove 3 T-15 screws (Type F) from the Left Hand Cover (front).

11. Remove the Left Hand Cover from the Printer. When handling the Tubes make sure you do not damage them by twisting.


Remove the right rear cover:

1. Remove one T-15 screw (Type B) from the Right Rear Cover.

2. Remove the Right Rear Cover.


Remove the right hand cover:

To remove the Right Hand Cover you must open the Right Cover
door and push in the Printhead Cleaner Carriage.
1. Remove the Right Rear Cover
2. Remove the Ferrite and disconnect the Front Panel cable from the Main PCA from the left side of the Electronics Module.
3. On the Main PCA, disconnect the Aerosol Fan cable from position P30 and the service station door from
position P29. Take care not to drop the Cover when removing the screws. Support the Cover throughout the next step.

4. Remove 1 T-15 screw (Type F) and 1 T-25 screw (Type U) (bottom) from the rear of the Right Hand Cover.

5. Open the Top Cover.
6. Raise the Media Lever.

7. Remove 3 T-15 (Type F) screws from the front of the Right Hand Cover.

8. To release the cables, pull out the Right Hand Cover until the cables can be accessed.

9. Remove the Right Hand Cover.


Remove the tensioner assembly:

1. Remove the Left Hand Cover
2. Remove the Right Hand Cover
3. Remove the 5.5 mm nut from the left hand side of the Printer that attaches the Encoder Strip to the Spring Clip. TIP The next step is performed by putting pressure on the Spring Clip as shown.

4. Release the Encoder Strip from the retaining pin on the Spring Clip.

5. Using a screwdriver, fully tighten the Spring Release Screw to release the tension on the Belt.

6. From the right-hand side, lift the Tensioner Belt off the Scan-Axis Motor.

7. Remove 1 T-15 screw (Type L) from the Tensioner Assembly.

8. Remove the Belt Wheel on the left side.

9. Remove the Tensioner Assembly from the left-hand side.


Removing carriage assembly and belt:

1. Remove the Left Hand Cover
2. Remove the Right Rear Cover
3. Remove the Right Hand Cover
4. Remove the Tensioner Assembly
5. Pull out Printhead Cleaner Carriage.

6. Slide Carriage Assembly to position shown.

7. Lift up the Carriage Cover and remove ALL the Printheads and close the Carriage Cover.

8. Slide the Carriage along the Printer to the position shown.

9. Push in the 2 retaining clips either side of the Printhead Tube Connector.

10. Pull the Printhead Tube Connector towards you.

11. Push the button to release the Printhead Tubes in the Carriage.

12. Release the retaining clip by pulling it away from the holding brackets.

13. Pull the Printhead Tube Connector up between the two Tube Guides.

14. Slide the Carriage to the left side of the Printer.

15. Unclip and remove the Carriage Cover to access the Trailing Cable in the Carriage.

16. Carefully disconnect the Trailing Cables (3) from the connectors in the Carriage PCA.
NOTE Remove Trailing Cable Ferrites if they fall into the Carriage

17. Remove the Trailing Cables from the Trailing Cable Holder. TIP Press the Trailing Cables
firmly in the center to release.

18. Slide the Trailing Cable Guide out of the Carriage.

19. Slide the Carriage (including the Belt) to the left and out of the Printer.

20. Remove the Belt from the Carriage by releasing it from the retaining clips underneath the Carriage.


Installation of Carriage and Belt:

Before installation, clean and oil the Slider Rods using the User’s Slider Rods Lubrification Kit. Make sure you install the Carriage Assembly and Belt as follows:
1. Insert belt as indicated on the underside of Carriage.An arrow on the bottom of the Carriage indicates position and direction.

2. Line up the Carriage Guide, on the underside of the carriage, with the Slider Rods on the Printer.


Before installing the Carriage Assembly, remove the EMC Covers and check if there are Locating Pins for the Encoder Strip present at the rear of the Printer.
a If there are Locating Pins present, then you must break the Encoder Guide at the rear of the Carriage Assembly and then go to step 4 to install the Carriage Assembly.

b If there are no Locating Pins present, then go to step 4 to install the Carriage Assembly.


3. If you install the Carriage Assembly with the Encoder Guide broken off, then install the Encoder Strip by
inserting it into the Encoder Sensor at the rear of the Carriage Assembly as shown in this figure.

4. If you install the Carriage Assembly with the Encoder Guide, then install the Encoder Strip by sliding it into the Encoder Sensor at the rear of the Carriage Assembly as shown in this figure.